
Gallery Wall Guide: Layouts, Spacing, Frame Heights and Hanging Tips
A gallery wall turns a blank stretch of wall into the focal point of a room. It lets you mix photos, prints, mirrors and small objects in one arrangement that feels personal. It can also go wrong fast. Frames hung too high, uneven gaps and a lopsided layout make the whole wall look accidental. A simple plan, done on the floor before any nails go in, avoids those problems.
A gallery wall is a group of framed pieces arranged together on a wall as one composition. The pieces can match for a formal look, or vary in size, color and style for a more collected feel. What ties them together is spacing, alignment and a shared theme.
This guide covers how to choose the wall and the pieces, how to plan layouts, what spacing and height to use, and how to hang everything safely. You will also find tips for renters, small walls and common mistakes.
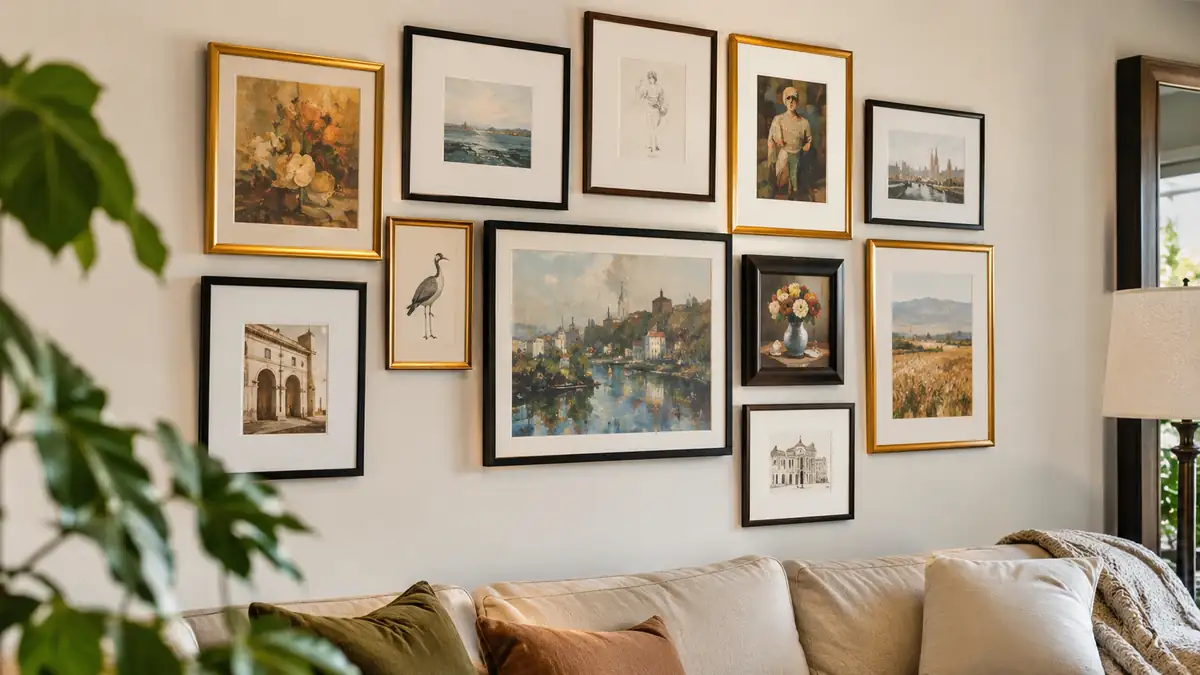
Where should you put a gallery wall?
Pick a wall that gets noticed. Good choices include the wall above a sofa, behind a bed, along a staircase, in an entryway or in a hallway. Large empty walls in a dining room or home office also suit a gallery.
Think about the furniture beneath. A gallery wall above a sofa or console should relate to its width. A common guideline is to make the whole arrangement about two thirds to three quarters of the width of the furniture below, so the wall and the sofa feel connected.
Check the light. Direct sun can fade prints, so avoid placing valuable photos or artwork in strong sunlight. Check the wall for studs, outlets and switches, and decide whether you need to work around them.
How do you choose pieces?
Start with what you have. Family photos, travel prints, children’s drawings, posters and small paintings all work. Add a mirror, a woven plate or a small shelf to bring in different shapes and textures.
Choose a unifying element. It could be a color palette, such as black and white, a frame color, such as all wood or all black, or a theme, such as travel, botanicals or family. A mix of styles works if one thing repeats. For example, different pictures in matching black frames feels cohesive.
Vary sizes, with a few larger pieces and several smaller ones. Include different orientations, both portrait and landscape, so the eye moves around the arrangement. Use mats to give photos a clean, expensive look, and keep the mat widths consistent.
What layouts work well?
A grid layout uses frames of the same size, aligned in rows and columns with equal gaps. It looks formal and modern and is the easiest to get right. It works for a set of related prints, like a series of botanicals.
A salon style layout mixes frame sizes and fills the wall in an organic way. It has a relaxed, collected look. To make it work, put the largest piece near the center, and add medium and small pieces around it, keeping the outer shape roughly rectangular or oval.
A linear layout lines pieces along a single row, which suits above a sofa, along a hallway or over a bed. A staircase layout follows the slope of the stairs, with pieces stepping up along the line. A cluster layout groups a few pieces around one anchor, and works for small walls or corners.
How high should you hang art?
A common rule is to hang the center of the arrangement at about 57 to 60 inches from the floor, roughly eye level for an average person. For a gallery wall, treat the whole group as one piece and center it at that height.
Above furniture, leave about 6 to 10 inches between the bottom of the lowest frames and the top of the sofa or console. Too much space makes the art float, and too little makes it feel crowded. For a gallery wall above a bed, keep the lowest frames around 8 to 12 inches above the headboard.
In a hallway or stairway, consider the viewing angle. On stairs, hang pieces so they follow the line of the staircase, with the center of each frame at about 57 inches above the step in front of it.
How much space between frames?
Consistent gaps make an arrangement look intentional. A common guideline is 2 to 3 inches between frames. Smaller gaps, around 1 to 2 inches, create a tight, modern look, and larger gaps, 3 to 4 inches, feel airier and suit large frames.
Keep the gap the same horizontally and vertically, even if frames differ in size. If your spacing varies, it will look messy. Use a ruler or a spacer, such as a piece of cardboard cut to the gap size, as you hang.
Align at least one edge. In a grid, align both top and side edges. In salon style, aim for a shared horizontal or vertical line through the middle of the arrangement, and keep the outer edge roughly even.
How do you plan before you hang?
Lay everything out on the floor first. Use a rug or a large sheet of paper the size of the wall space, and arrange the frames until you like the layout. Take a photo to refer to later.
Make paper templates by tracing each frame onto kraft paper or newspaper, and cut them out. Mark where the hanging hardware sits on each template. Tape the templates to the wall with painter’s tape and adjust them until the layout works. This lets you nail through the paper at the right spot without moving anything.
Start with the largest or central piece and work outward. Hang the anchor first at the correct height, and add pieces around it. Step back often to check the balance.
What hardware should you use?
Use hooks and nails rated for the weight of each frame. Small, light frames can hang from a small nail or a picture hook. Heavier frames or mirrors need stronger hooks, screws or anchors, ideally attached to a stud.
For drywall, use anchors for anything heavy. For plaster walls, use picture hooks to reduce cracking. For masonry, use masonry nails or screws with plugs. If a frame has two hanging points, use two hooks to keep it level.
Renters can use adhesive strips made for hanging frames. Check the weight limit, follow the instructions about cleaning the wall and wait the recommended time before hanging. Rails and ledges let you swap and lean pictures without extra holes.
What if you have a small wall or a rental?
Choose fewer, larger pieces, or a tight cluster of small ones. A narrow wall suits a vertical column of frames. Use pieces with light frames and wide mats to keep the wall from looking heavy.
In a rental, use removable adhesive strips, picture ledges and leaning frames on a shelf or dresser. You can create a gallery effect without any holes. Take a photo of the layout to rehang it in your next home.
What mistakes should you avoid?
The most common mistake is hanging too high. Many people place art near the ceiling, and it ends up disconnected from the room. Another is uneven spacing, which makes the arrangement look random. A third is ignoring the furniture below.
Others include mixing too many frame colors with no pattern, skipping the floor plan and using weak hardware. Plan on the floor, use a level and keep the gaps consistent. If you change your mind, patch the holes with filler and touch up the paint.
Frequently Asked Questions
How high should I hang a gallery wall?
Center the whole arrangement about 57 to 60 inches from the floor. Above a sofa, leave 6 to 10 inches between the furniture and the lowest frames.
How much space should be between frames?
About 2 to 3 inches is common. Keep the gaps equal on all sides.
How many frames do I need for a gallery wall?
It depends on the wall. Five to nine pieces suit most walls, and fewer suit small walls.
Do the frames have to match?
No. A shared color, a repeated mat or a common theme can tie different frames together.
Can I make a gallery wall in a rental?
Yes. Use adhesive strips, picture ledges or leaning frames to avoid drilling.
Conclusion
A great gallery wall starts with a plan. Pick a wall, gather pieces with a shared element, lay them out on the floor and use templates to mark the wall. Keep spacing even, hang at eye level and use hardware suited to each frame.
With a bit of patience, a gallery wall can show off your photos and art and make a room feel finished and personal.
Related guides
 Table Lamps Guide: Sizes, Shade Shapes, Bulbs and PlacementA table lamp does two jobs at once. It gives you light where you need it, and it adds shape, color and warmth…Read more →
 Floor Vases Guide: Sizes, Materials, Styling and What to Put in ThemA floor vase fills the awkward gaps in a room, such as an empty corner, the space beside a fireplace or the end…Read more →
 Wall Clocks Guide: Sizes, Styles, Movements and Where to Hang OneA wall clock is one of the few decor pieces that has to work as well as it looks. It should be easy to read fromRead more →
 Throw Blankets Guide: Sizes, Fabrics, Care and How to Style ThemA throw blanket is the easiest way to make a sofa or bed feel inviting. It adds color, texture and warmth, and…Read more →



One Comment